photo ALD2_01_zps50dad88e.gif photo ALD2_02_zps675202e8.gif photo ALD2_03_zps760ab72c.gif photo ALD2_04_zps4c8c616a.gif photo ALD2_05_zps83ef5d6e.gif photo ALD2_06_zps31aa4937.gif
Showing posts with label In the Kitchen. Show all posts

April 8, 2013

Starting The Dr. Oz 3 Day Cleanse

Today is Day 1 on the Dr. Oz 3-Day Cleanse! I had pinned the information on this cleanse awhile back and my sister and I decided to give it a try this week. With all the eating I did for Easter and the lingering candy I can't seem to stop eating, I thought this would be the perfect time to jump-start a healthier eating kick. Not to mention, Sister and I only have 2 months left to be in tip-top shape for Italy!!
I'll be reviewing the cleanse and posting our results at the end in case any of you are looking to try it. I like how it seems very easy to follow and the directions are extremely specific so it would be very hard to mess it up! The cleanse involves 3 different shakes, vitamins/supplements and  a detox bath every night -- looking forward to that part! Before you start be sure to do a weigh-in and measure your waist and a few other areas, so you can track your results at the end.
Via
My sister and I will be back with our review of the cleanse and our results later this week!

Morning Detox Tea, not a bad way to start the day!

 photo ALDsig_zpsf3ec04b2.jpg

March 28, 2013

In the Kitchen: Hummingbird Cake

Notice anything different around here? I'm so excited to have my new blog design live! I feel like the design just got brought back into this century, fresh and clean now! The white background is so nice to see instead of my old, dark gray. If you need any blog design work done, be sure to visit Kayla, she's awesome! 

Now onto the food...I have a perfect Easter dessert to share with you! I made this for Easter last year and wanted to share before this weekend, although this would be perfect for any Spring gathering or party. They say Hummingbird Cake is supposedly so delicious it will even attract hummingbirds. I can attest that is was extremely delicious. Sweet, without being too heavy, which makes for a perfect Spring dessert. And it stayed nice and moist! You typically see these served with a cream cheese frosting, but I'm not a big cream cheese fan so I went with vanilla buttercream. Another frosting that would be perfect on this is Brown Butter.


INGREDIENTS:
(Recipe from Woman's Day Magazine, April 2009)
 - 3 cups all-purpose flour
- 2 cups sugar
- 1 1/2 tsp each, baking soda and ground cinnamon
- 1/2 tsp salt
- 3 large eggs
- 3/4 cup oil
- 2 tsp vanilla extract
- 1 can (8 oz) crushed pineapple in juice
- 2 cups mashed bananas (3-4 large bananas)
- 1 cup pecan pieces, finely chopped

For Vanilla Buttercream Frosting (makes 2.5 cups)
(Recipe from Savory Sweet Life)
- 1 cup unsalted butter, softened but not melted (ideal texture should be like ice cream)
- 3-4 cups confectioners sugar, sifted
- 1/4 tsp salt
- 1 tbs vanilla extract
- Up to 4 tablespoons milk or heavy cream


PREPARATION:
Adjust oven racks to divide in thirds and preheat to 350 degrees. Coat 3, 8x12 in. cake pans with cooking spray. Line bottoms with wax paper and spray wax paper
.
Whisk flour, sugar, baking soda, cinnamon and salt together in large bowl until well mixed.

In another large bowl, whisk eggs, oil, vanilla, crushed pineapple with juice, mashed banana and pecans until blended. It will smell delicious! Add this to the flour mixture and stir just until combined. Divide batter evenly among prepared cake pans. Bake for 30 minutes until wooden pick inserted in center comes out clean. Cool in pans on wire racks for 10 minutes.

Once cakes are cooled, begin preparing the frosting. Beat butter for a few minutes with the paddle attachment on a mixer. Add 3 cups of powdered sugar and turn your mixer on the lowest speed (so sugar doesn't go everywhere) until the sugar has been incorporated with the butter.

Increase mixer speed to medium and add vanilla extract, salt and 2 tablespoons of milk/cream and beat for 3 minutes. If frosting needs to be stiffer, add more sugar. On the otherhand, if you want to thin it out, add more of the cream/milk.

For the cake layers, be sure to flip them upside down when you place on the cake stand/plate so you will be frosting the most even, bottom side. Start with one layer and frost the top, then add another layer and do the same thing. One tip I have for frosting is to line the bottom of your cake stand or plate with wax paper so it is just under each of the cake edges. This way if the frosting gets all over, you can just pull away the wax paper and mess before serving. When frosting is complete, sprinkle flaked coconut over the top.


 photo ALDsig_zpsf3ec04b2.jpg

July 17, 2012

In the Kitchen: "Healthy" Buffalo Chicken Dip

Oh buffalo sauce, how do you make everything so delicious? I'm a big buffalo wing lover and with all the hot buffalo sauce inspired recipes out there, it was time I tried to make one of the dips. This is a lighter version than most, I don't know if you can call it "healthy" but it is definitely lightened up by using low-fat sour cream, cream cheese and shredded cheese.

The recipe was adapted from here. One key thing I changed was adding blue cheese, whats a buffalo chicken recipe without blue cheese thrown in there? This recipe is perfect for parties, always a hit! Not to mention, so easy to make. And to keep it on the lighter side you can serve it with carrots and celery in addition to chips.

INGREDIENTS
2 chicken breasts, shredded
2 packages (8 oz each) of low-fat cream cheese, softened
1 cup low-fat sour cream
3/4 cup Frank's Red Hot Buffalo Sauce
1 teaspoon garlic powder
1.5 cups shredded cheese, I used half mozzarella, half chedder
1 small package of blue cheese crumbles
Tortilla chips, carrots and celery for dipping

PREPARATION
Preheat oven to 350 degrees. Mix all ingredients together, except for a half cup of the shredded cheese and a quarter of the blue cheese crumbles.


Transfer to a baking dish, I used an oval shaped Le Cruset, about the equivalent of of an 11x8 pan. Sprinkle reserved cheese over top.


Bake for about 15 minutes, then turn on the broiler for a few minutes to slightly crisp up the top and get that golden brown color on the cheese. YUM.


The dip turned out great and is so simple to make! I would definitely love to try a slow cooker version, because the dip is best when it's kept warm. If you love Buffalo inspired dishes as much as I do, you may also want to try the Buffalo Sloppy Joe's recipe -- definitely delicious but a bit healthier than this dip!

Linking up to Tasty Tuesdays at Big Sis's blog today. Head over for lots of recipe ideas!

May 15, 2012

In the Kitchen: Pdub's Simple, Perfect Beef Enchiladas

You know I love a good Mexican feast, which is why I was so excited to make these enchiladas from my Pioneer Women cookbook. Pdubs calls them "simple and perfect" and I really can't disagree. They're easy to make and full of cheesy, Mexican goodness. The recipe is in the Pioneer Women's first cookbook and posted online here. She splits it up into three sections, the sauce, meat and the rest.

INGREDIENTS
Sauce:
1 tbs canola oil
1 tbs flour
1 can (28 oz) enchilada sauce
2 cups chicken broth
2 tbs chopped cilantro
1/2 tsp each slat & pepper

Meat:
1 and 1/2 lbs ground beef
1 medium onion, diced
2 cans (4 oz) diced green chilies
1/2 tsp salt

The Rest:
10-14 corn tortillas
3 cups grated sharp cheddar cheese (I've gone the PW way on cheese, shredding it yourself somehow tastes so much better than the store bought shredded, it's cheaper too!)
1/2 cup chopped black olives
1 cup chopped green onions
1/2 cup chopped cilantro

PREPARATION
In a large saucepan over medium heat, add oil and flour and whisk together to make a paste, cooking for one minute. Pour in the red sauce, chicken broth, cilantro, salt and pepper. Bring to a boil. Reduce heat and simmer 30-45 minutes.


Meanwhile, brown the meat with onions in a skillet. Drain off fat. Stir in 2 cans diced green chilies and seasoned salt. I like a little kick so I used one can of hot jalapenos instead of the second can of green chilies. Set aside.

Preheat the over to 350 and pour enough red sauce into your baking dish to cover the bottom. To keep this a little bit healthier, I didn't fry the tortillas, to soften before filling I just dipped each one into the sauce using tongs. Once all the tortillas are ready use a cookie sheet for the assembly. Spoon a little meat, grated cheese, black olives and green onions in the tortilla and roll up, placing seam side down in a baking dish.


Pour extra red sauce over the tortillas and top with remaining cheese.


Bake for 20 minutes or until bubbly. And really, is there anything better than bubbling cheese?! Sprinkle cilantro and green onions for garnish. The recipe is also perfect for freezing. I always have enough to make a few containers for the freezer. Right before the step of putting everything in the oven, freeze a few portions with sauce and cheese and you'll have a super easy meal for another week.


If you're an enchilada lover like me, check out my other recipes:
Spicy Chicken Enchiladas
Bean Enchiladas a la Ali

Linking up to Tasty Tuesday's on my Sister's blog today, lots of good recipes posted over there!

January 13, 2012

In the Kitchen: Orzo Dill Pasta w/ olives, feta & sun dried tomatoes

Hi guys! It's been AWHILE since I last really blogged, sorry for the absence. I was starting to miss you guys! I definitely took the Christmas break thing seriously. My office is closed between Christmas and New Year's so I was relaxing in Michigan for a nice, looong break just hanging out with family and friends. I brought my laptop home with me and literally never opened it. Kind of refreshing! Although, I was on my smartphone quite a bit :) Anyway, hope everyone is having a great start to 2012!

I made this pasta the other week and it turned out so delicious! I was inspired by a cold pasta salad sold at Treasure Island, a European style market in the Chicago area and one of my favorite places to grocery shop! I served this warm, but it was equally delicious the next day as a cold pasta salad.

Ingredients:
- Orzo pasta, about half of a 1lb package
- Fresh dill to taste, chopped
- 1/4-1/3 cup sun dried tomatoes, cut into small pieces
- 1/3 cup feta cheese, I used domestic cow's milk feta
- 1/3 cup Kalamata olives, cut in halves or thirds
- 2-3 tbsp olive oil
- salt and pepper to taste
- Note: All amounts can be done to your preference, I didn't measure exact amounts of anything, just threw in as many tomatoes, olives, etc. as tasted good and believe me, it does taste good!

I have the WORST kitchen lighting for pictures ever! It doesn't help that it's always pitch dark out when I'm cooking after work...sigh. Please excuse this picture quality.

Preparation:
Begin by bringing water to a boil for the pasta. While you wait for it to boil, cut and chop all the ingredients. Cook pasta until al dente. I just LOVE Orzo pasta! My family has always used it in our traditional Italian chicken soup recipe, but lately I've been using it for all sorts of pasta recipes.

Once the pasta is done things get pretty easy, just throw all the ingredients together and mix! The reason I liked serving this warm was because the feta cheese started melting and added a creaminess to the pasta that was delicious. The feta I used was domestic and made from cow's milk, whereas a lot of the fetas I normally buy are imported and have a slightly stronger taste. This type tasted milder and ended up working perfectly in the recipe.


October 8, 2011

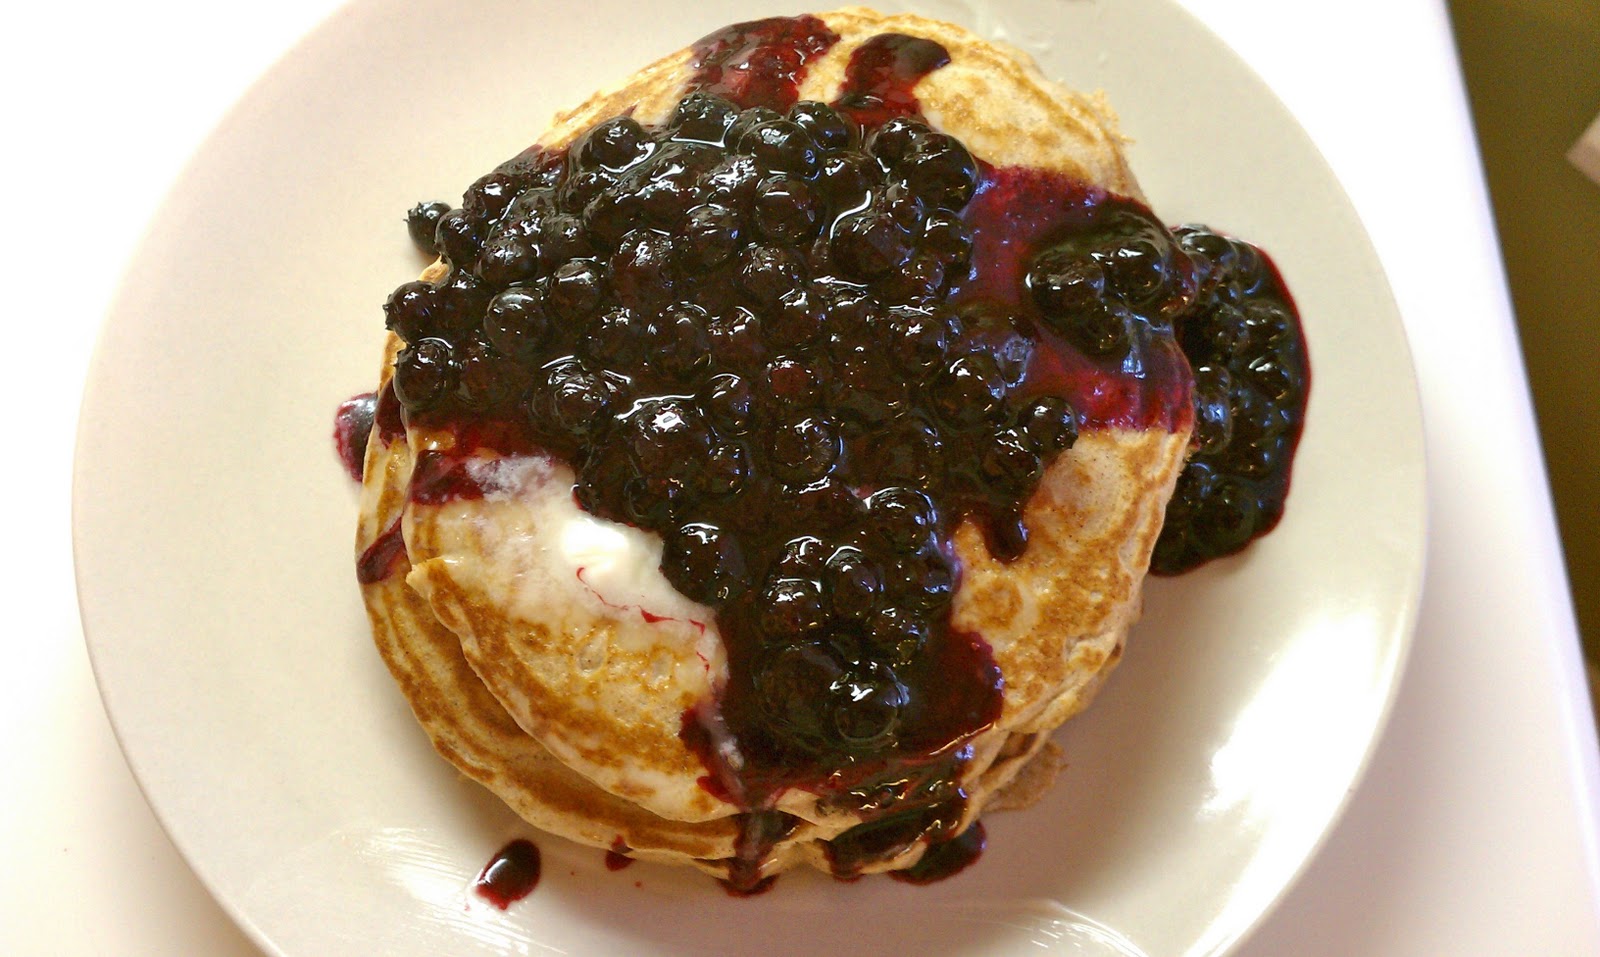
In the Kitchen: Whole Wheat Pancakes with Blueberry Compote

I've got a perfect weekend recipe to share with you! And it's healthy too! I recently found a new blog with all healthy recipes, and everything looks delicious -- Skinnytaste. She had a great recipe for whole wheat pancakes posted the other week, I tried it a few weekends ago and they were so delicious, they definitely didn't taste "healthy." I had some Michigan blueberries on hand, so I made a super easy compote as well (Food Network Recipe here). Here are the details...

Pancakes
Ingredients:
- 2 cups whole wheat flour or white whole wheat
- 4 1/2 tsp baking powder
- 1/2 tsp salt
- 2 tsp cinnamon
- 2 tsp sugar
- 2 large eggs
- 2 cups + 2 tbsp fat free milk
- 2 tsp vanilla
- cooking spray


Preparation:
Mix all the dry ingredients in a medium bowl, next add in the wet ingredients (eggs, milk, vanilla) and hand mix until there are no dry spots. Be careful not to over-mix.


Heat up a skillet over medium heat and spray lightly with cooking spray. Spoon the pancakes on using a 1/4 cup. When the bubbles on the pancakes set, flip over. Repeat with the remainder of the batter.

Blueberry Compote
Ingredients:
- 2 cups frozen blueberries
- 3 tablespoons water
- 1/4 cup sugar
- 2 teaspoons lemon juice

Love me some Michigan blueberries!!


Preparation:
Combine 1 cup of the blueberries and water, sugar and lemon juice in a small saucepan. Cook over medium heat for 10 minutes. Add the rest of the blueberries and cook for 8 more minutes, making sure to stir frequently. I ended up having some compote leftover and used it on the oatmeal the next day, equally delicious. And I had no idea how easy it is to make! Since it calls for frozen blueberries, you could be making this all winter long!


When both are done, pour some of the compote over a stack of pancakes. Yum!


Happy Weekend :) Linking up to Tasty Tuesdays at Big Sister's blog today and the Cast Party over at Lady Behind the Curtain! Head over for tons of great recipes!

August 23, 2011

In the Kitchen: Shrimp tacos with Chipotle

I've been loving Chipotle Peppers lately! I've made everything from pulled pork to pasta salad using chipotle peppers, seems like P Dubs is in a chipotle mood lately too, two of my recipes came from her! I found this awesome recipe for Shrimp tacos and the real kicker to them is the chipotle and sour cream sauce. It takes the tacos to a whole other level! These are very simple to make, here's the lowdown:

Ingredients
- Frozen Raw Shrimp, amount can be variable, figure 4-5 shrimp per taco
- 2 limes
- Old Bay seasoning, Pepper, Jane's Krazy Salt, Chili Powder
- One small chipotle from can, minced
- 1/2 cup sour cream
- Corn tortillas
- Cabbage shredded or prepackaged coleslaw mix
- Avocado and guacamole seasoning, optional

Seasoning for the shrimp

Preparation
Begin by thawing the shrimp, this can easily be done by soaking in cold water for 5-8 minutes. When the shrimp are defrosted, pat dry and sprinkle the seasoning on them, you can be generous with your seasoning! I like them spicy personally, so I load on the spices.


 Set the shrimp aside for a moment so you can put the sauce together. Mix the sour cream, chipotle pepper and juice from half a lime in a bowl. (At this point I whip up the guacamole as well, that is completely optional though, I am just a guacamole freak and eat it with every meal possible!) Now set this aside and heat a skillet for cooking the shrimp.

Chipotle sauce
The shrimp will cook fast (about 3-4 minutes each side or less), when they are almost done sprinkle more fresh lime juice over them.


Now, time to assemble the tacos. I put a little of the special chipotle sauce and guac in the bottom, then throw in the shrimp and cabbage or coleslaw mix. Squeeze lime juice over the top and it's all done. Delicious and easy!


I'm linking up to Tasty Tuesdays, Delectable Tuesdays & Remodelaholic today! Head over to check out some other great recipes and link up your own.

June 2, 2011

In the Kitchen: Easy chicken fajitas

Since I haven't been blogging in awhile, I have tons of recipes stockpiled that I want to share with you guys! First up is a really simple chicken fajitas meal that's become a favorite of mine. The directions for this are probably a no brainer for most cooks, but it's so delicious I still thought I would share!

Ingredients:
- Chicken breast tenders (your choice on the amount)
- Bell peppers cut into thin slices
- Onion sliced
- Spices; ground pepper, chili powder, Jane's Crazy Salt, cajun spice mix
- One chipotle pepper in it's own juice
- One lime
- Whole wheat flour tortillas
- Shredded cheese
- Tomatoes (optional)
- Guacamole and sour cream (optional)
- Olive oil  


Preparation:
First get the peppers cooking with a little bit of olive oil. Next you can make the guacamole to set aside, I just use a seasoning packet and add a squeeze of fresh lime juice.

Next, take the chicken out and season it with all the spices mentioned above. This isn't an exact science, so feel free to add other spices that you love. For me, the key to the chicken is using the already cut up chicken breast tenders. The small size makes them so juicy and delicious! Heat up a pan to cook the chicken and throw in some olive oil, fresh squeezed lime juice and one chipotle pepper cut up and a little of the juice from the can.


Now throw the chicken in the pan. Once it's in the pan, squeeze more lime juice onto each piece. Let it cook for about 10 minutes, turning a few times.


When the peppers & onion and chicken are close to being done, warm up your tortillas. I've recently made the switch to a true whole wheat variety, and I haven't even missed the white flour much! You can also get out all your toppings, I used shredded cheese, cherry tomatoes and a little sour cream and of course lots of guac!

Shred the chicken into small pieces and assemble the fajitas. YUM! These are so easy and so good! Let me know if you guys like them :)


This week I'm linking up to:
Tasty Tuesdays at my sister's blog!!


October 12, 2010

In the Kitchen: spicy chicken enchiladas

I think it's pretty obvious I've got a real obsession with Mexican food. See here if you don't believe me! It might not be normal that I could easily eat something mexican-ish every day of the week! My quest for simply great Mexican food led me here. I've tried countless chicken enchilada recipes and haven't been able to quite achieve the taste I want. This one, is the best I've made. Really delicious. It's a Tyler Florence recipe from Food Network.com (and has a 5-star rating on their site).


Ingredients:
- Few tablespoons olive oil
- 1 & 1/2 pounds skinless boneless chicken breast
- Salt and Pepper
- 2 teaspoons cumin powder
- 2 teaspoons garlic powder
- 1 teaspoons Mexican spice blend
- 1 red onion, chopped
- 2 cloves garlic, minced
- 1 cup frozen corn
- 5 canned whole green chiles (I used jalapenos, hence the "spicy" in the title!)
- 4 canned chipotle chiles, seeded and minced
- 1/2 can stewed tomatoes
- 1/2 teaspoon flour
- 16 corn tortillas
- 1 & 1/2 cups enchilada sauce (canned)
- 1 cup shredded Cheddar and Jack cheeses
- Garnishes, cilantro, scallions, sour cream and anything else that sounds good!

First things first, get those chicken breasts cookin'! Season them with salt and pepper. Before turning the chicken sprinkle with cumin, garlic powder and Mexican spices. When the chicken is done, remove to a plate and let cool.

Now it's time to get the filling together. Saute onion and garlic in chicken drippings until tender. Add the corn and chiles. Add the canned tomatoes. The original recipe calls for 1 can, but I don't care for really sauce-y, tomato-y sauce, so I used very few. Stir all this together well.

Pull chicken breasts apart and "shred." Add chicken to the saute pan with the vegetables. Sprinkle flour over the pan to set the filling. You can also preheat the oven to 350 now.


Now it's time to get the tortillas ready to be filled. Take a stack of tortillas and wrap them in a damp paper towel. Heat in the microwave for 30 seconds. Spread some of the enchilada sauce into two 13x9 inch pans. Also, fill a low shallow bowl with sauce for dipping the corn tortillas in. Spoon some of the chicken mixture into each tortilla, wrapping up and placing seam side down in the pans. Now pour sauce over the enchiladas in the pan. (I noticed a lot of people on foodnetwork.com were ticked Tyler used canned sauce, personally I like canned enchilada sauce! Hey, the rest is still homemade.)


I had way too much food for just me, but the tortillas fit perfect in little ziploc square containers. I covered in sauce and froze a few. I will add the cheese when I take out to cook.


OK, one more step before putting these guys in the oven. Generously sprinkle cheese over the top. Yum.

Bake in the oven at 350 for 15 minutes. While baking, whip up some guacamole. I just can't have homemade enchis without the guacamole! Don't these look good? Fresh out of the oven. Sadly, this picture is actually making me hungry!

I served with blue corn chips, guac and sprinkled the enchiladas with cilantro and scallions. Another delicious Mexican dinner!


Linking up to "Tasty Tuesdays"!


And Tasty Tuesday Parade at Beauty and Bedlam!

LinkWithin

Related Posts with Thumbnails